Three Ways to Solve Float Problems with Clearfix
Introduction
Before CSS had display: flex to easily handle layouts, we often used float for horizontal parallel layouts. However, the floating side effects caused by using float were always frustrating. Therefore, this article mainly explores "three ways to clear floats (clearfix) using clear:both". After learning them, well... you'll probably just want to go back to using flex anyway.
Float Causes Element Height to Disappear
First, let's understand the problem: when we use float for layout, it causes the height of the floated element block to be ignored, which results in elements below moving up, creating layout errors. In other words, it can also cause the parent element's height to collapse because the height of the parent's content is ignored. A direct example makes this clearer - in the example below, you can see that the Footer unexpectedly moves up:
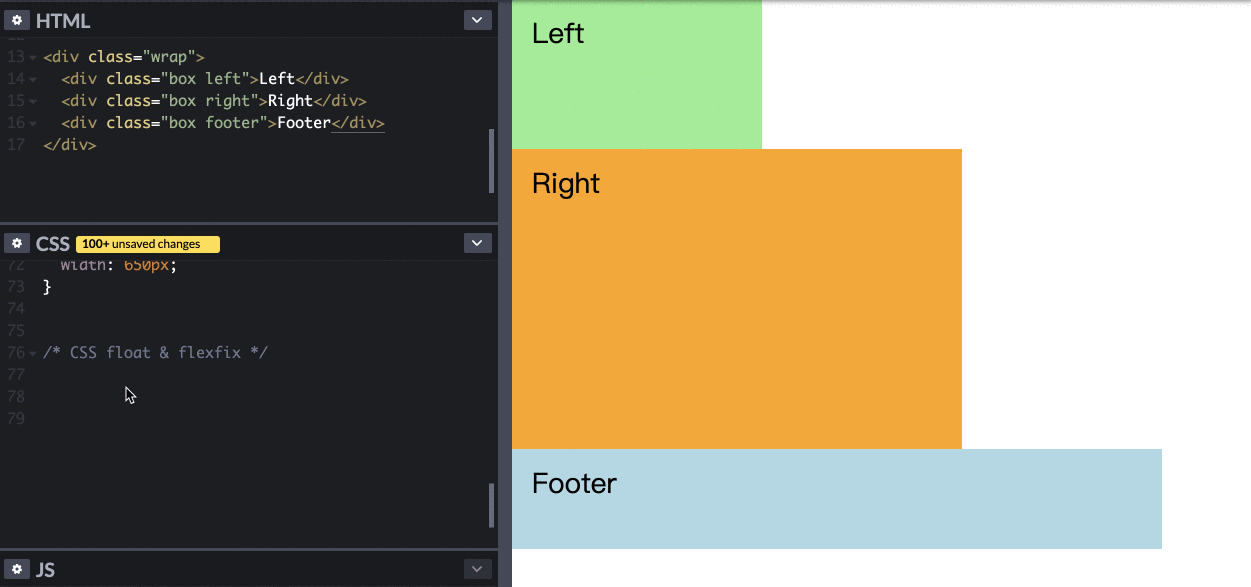
Why does this problem occur?
The float property, as the name suggests, "makes element blocks float up". This sounds mysterious, but the reason for this floating effect is actually because the height of the Left/Right blocks is ignored. It can be viewed as if the height becomes 0 (it actually has a value, but it's ignored), so the Footer block moves up because there's no height above it.
Clearfix to Solve Floating Problems
Now that we understand why float causes problems, let's look at how to solve them through the technique of "clearing floats (clearfix)".
Method 1: Using CSS Property clear: both
First, let's understand the clear property. When an element's CSS has the clear property, it "clears the floating situation encountered above the element", so it doesn't ignore the height of elements above it, returning to the normal vertical arrangement. In other words, if we add clear: both to the Footer, it will make the floating situation of the Left/Right blocks disappear (the height becomes visible again), so the layout returns to normal.
Simply put, we need to add clear: both to the CSS of the element that needs to return to normal vertical arrangement. In the example above, that would be the Footer.
.footer {
  clear: both;
}

/*
  clear: left only clears left floating effects
  clear: right only clears right floating effects
  clear: both clears all floating effects -> usually we just use this
*/
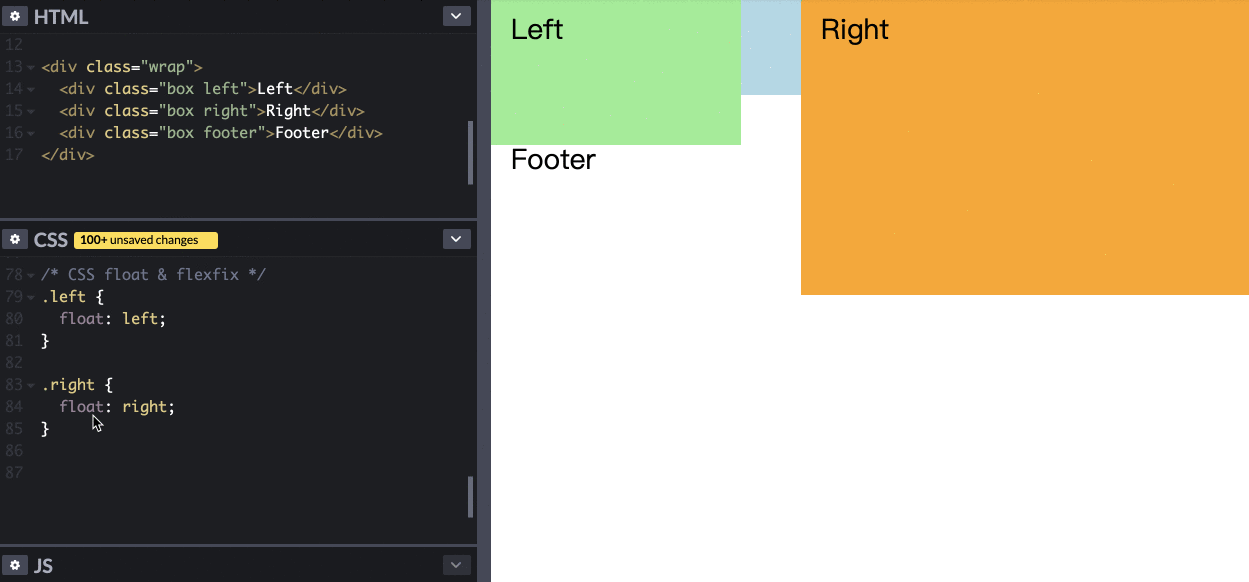
You can see that after adding clear: both, the Footer block does indeed return to below the Right block.
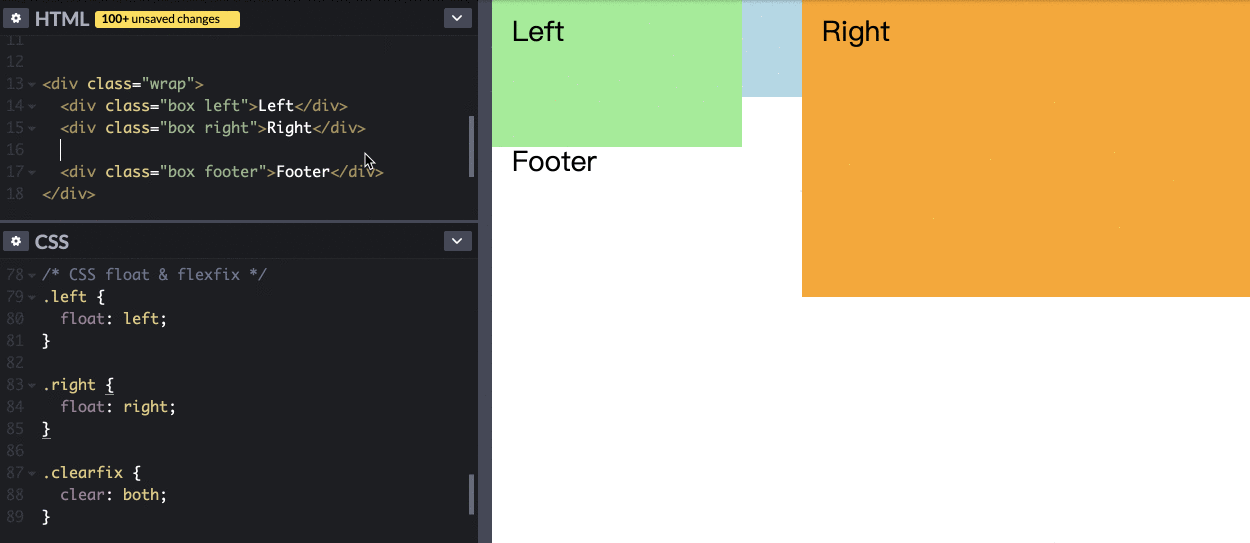
Method 2: Using .clearfix and clear: both
To make clearing floats more convenient and standardized, we can directly set a .clearfix selector in CSS and give it the clear: both property. When an element needs to clear floats, we insert the HTML code <div class="clearfix"></div> after the element that needs to clear floats, achieving the float-clearing effect.
We're treating <div class="clearfix"></div> as a tool for clearing floats, inserting it after the floating element's HTML.
<div class="wrap">
  <div class="box left">Left</div>
  <div class="box right">Right</div>

  <div class="clearfix"></div>
  <!--Added to clear floats above-->

  <div class="box footer">Footer</div>
</div>
.left {
  float: left;
}

.right {
  float: right;
}

.clearfix {
  /* Added property to clear floats */
  clear: both;
}
Okay, let's summarize. So far, we can solve floating problems through two methods:
- Add the
clear: bothproperty to the CSS of the element after the floating element. - In HTML, add
<div class="clearfix"></div>after the floating element; and in CSS, add.clearfix {clear: both;}.
However, these aren't the most convenient methods. The second method already allows using <div class="clearfix"></div> as a tool, but it's still too troublesome. Next, let's discuss the most convenient but relatively harder to understand third method.
Method 3: Using .clearfix::after to Clear Floats
This method uses the pseudo-element ::after and .clearfix to handle floating problems. Before explaining, there's a concept to keep in mind: Method 2 "Using .clearfix and clear: both" and Method 3 "Clearing floats with .clearfix::after" have the exact same principle, just different in code presentation, making clearing floats more convenient. Let's first look at the code differences, then explain:
HTML settings:
<!--- HTML changed in two places --->

<!-- 1. Wrap the floating parts with a parent div: change the wrap block to wrap Left & Right -->
<!-- 2. Add clearfix class name to that parent div: add clearfix class name to the wrap block -->

<div class="wrap clearfix">
  <div class="box left">Left</div>
  <div class="box right">Right</div>
</div>

<div class="box footer">Footer</div>
CSS float and clearfix settings:
/* CSS changes .clearfix to use the ::after pseudo-element for comprehensive handling*/

.left {
  float: left;
}

.right {
  float: right;
}

.clearfix::after {
  /* 1. Add ::after */
  content: ''; /* 2. Add content, note that "" is needed */
  display: block; /* 3. Add display, table can also be used */
  clear: both;
}
Let's summarize the three key changes:
- In CSS, add
::afterto the.clearfixselector and modify the HTML structure - Add
content: ""to the .clearfix::after property - Add
display: blockto the .clearfix::after property
First, we need to understand that ::after is a type of CSS pseudo-element. CSS pseudo-elements are not actual web elements, but can be manipulated through CSS to exhibit behaviors related to web elements, such as adding content.
The most common are ::before and ::after, which by default display as display: inline-block.
::beforerefers to content that can be manipulated with CSS "before" the original element.::afterrefers to content that can be manipulated with CSS "after" the original element.
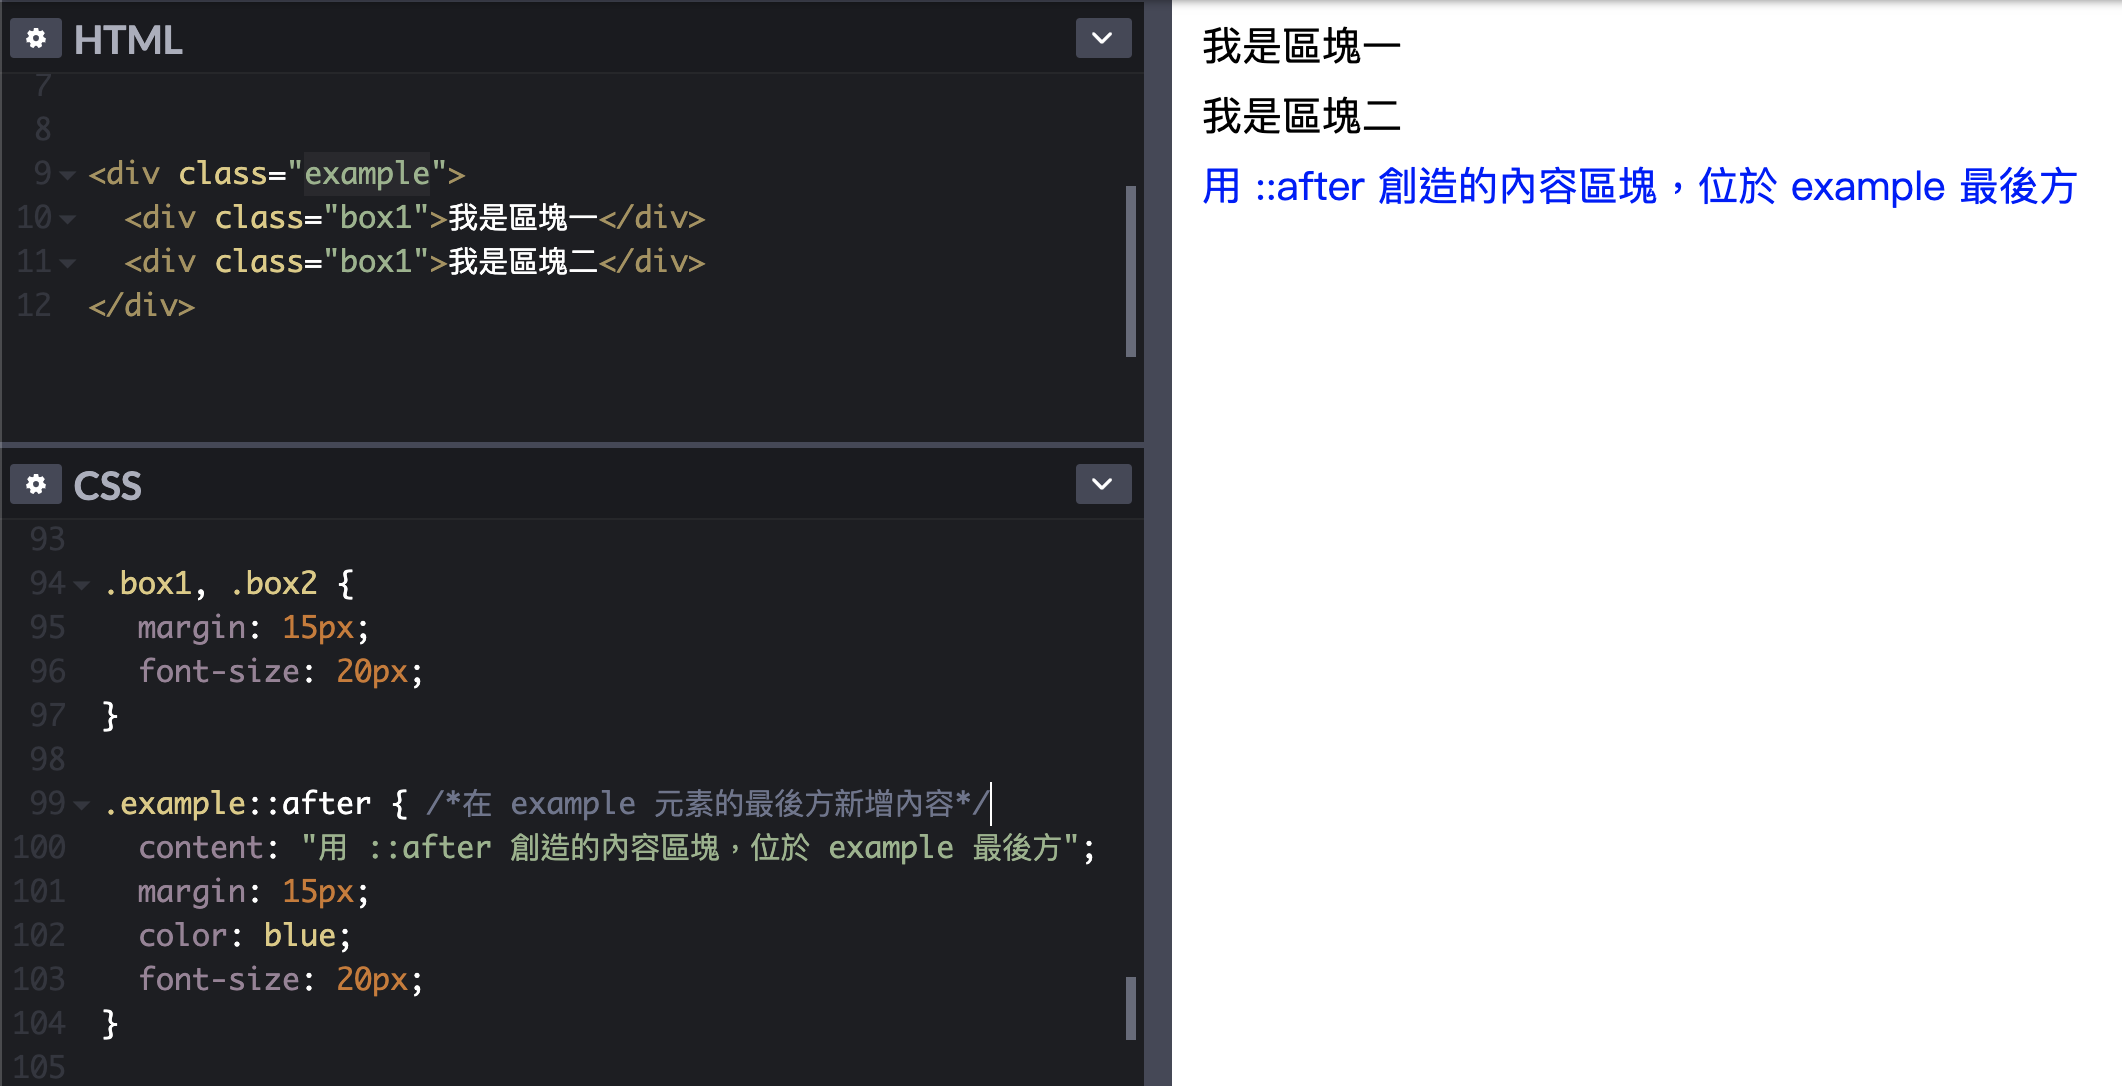
In the example above, .example::after is used to manipulate content after the example element (adding content). Thus, we understand that ::after can add elements after the selected element.
So here's the key point. Remember the important concept mentioned earlier: Methods 2 and 3 only differ in code presentation. Therefore, we can delete the <div class="clearfix"></div> element block from Method 2 and replace it with .clearfix::after to create an invisible element block with clear: both.
Therefore, the HTML will change. Please read carefully with the comments for better understanding:
<div class="wrap clearfix">
<!--Add clearfix-->
<div class="box left">Left</div>
<div class="box right">Right</div>
<!-- Delete this line <div class="clearfix"></div> -->
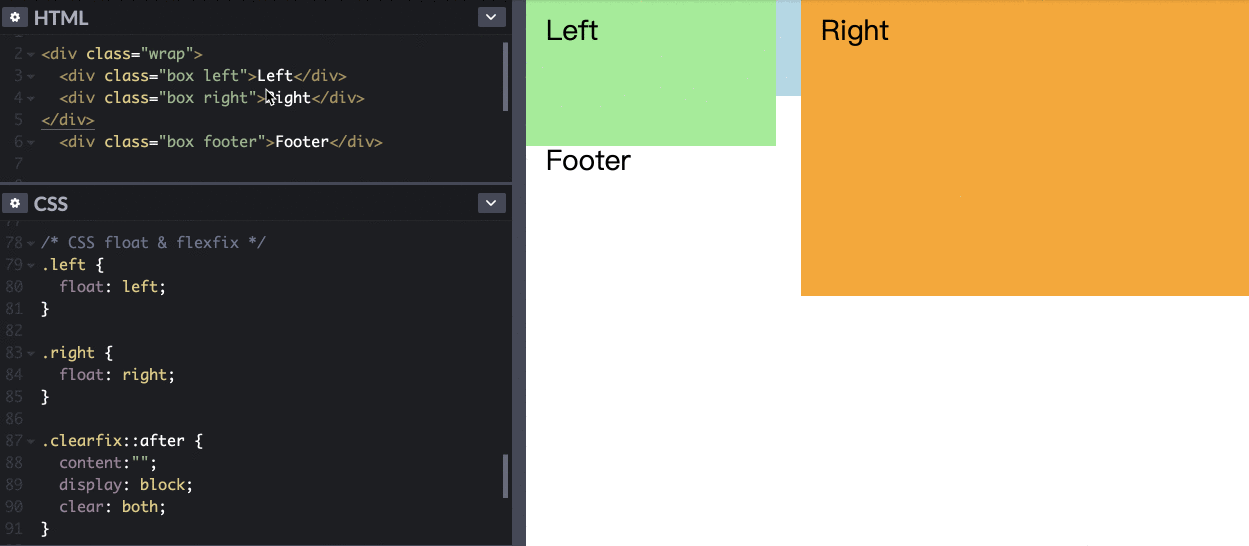
<!-- Through .clearfix::after, an element block will be added here, implementing clear: both -->
</div>
<div class="box footer">Footer</div>
Okay, if you've understood this far, we're almost done. Next, look at the CSS changes. Since the element block to be added must have several properties: "invisible content", "block" and have "clear: both", the combined block properties are:
- content: ""
- display: block
- clear: both
/* CSS handles .clearfix with the ::after pseudo-element */

.clearfix::after {
  /* ::after, to add a content block at the end of the clearfix element */
  content: ''; /* "" for invisible content, without it no block will be generated */
  display: block; /* Add "block" property, can use table instead */
  clear: both; /* Has the property to clear floats */
}
A special note on why display: table can replace display: block is because table also has block properties and is more compatible with IE 6/7 browsers. But nowadays, IE6/7 browsers are basically abandoned, and table can cause other problems, so display: block is recommended.
The convenience here is that you just need to add clearfix to the class of the parent element of the element you want to clear floats from, very convenient!
 You can play with it on codepen if interested
Summary: It's All Just Extensions of clear: both
After seeing the three methods of clearfix, have you noticed that these three methods are all actually just using clear: both? It's just that various clearfix solutions have emerged to make them more convenient to use.
Of the three methods above, I personally recommend Method 3: handling through .clear::after.
/* CSS handles .clearfix with the ::after pseudo-element */

.clearfix::after {
  content: '';
  display: block;
  clear: both;
}
If you search online, you'll find other methods to handle floating problems, such as using overflow to prop up the parent element's height, or the new display:flow-root. But currently, the mainstream is still using the pseudo-element ::after or its extended methods. No matter which method you use to handle problems caused by float, just know why you're using it, what problems it can avoid, or what problems it might potentially cause.
In fact, with the emergence of "grid" and "flex" in CSS now, the need to use "float" for layout has greatly reduced, so... you might not even need to use it XDD