理解 Redux 原始碼 (4):透過 Provider 與 connect 理解 React-Redux 的組合
前言
在前幾篇文章中:
- 理解 Redux 原始碼 (1):來實作 createStore 的 getState、dispatch、subscribe 吧
- 理解 Redux 原始碼 (2):來實作 middlewares、applyMiddleware 以及 createStore enhancer 吧
- 理解 Redux 原始碼 (3):來實作 combineReducers 吧
已探討 Redux 的主要概念和實現,包括 createStore、middlewares、applyMiddleware、以及 combineReducers,所以對 Redux 有不少的認識,如果不熟可再回頭看看上面的文章,或者閱讀 Redux 官方文件。
在近年前端世界中,不常見到單獨使用 Redux,而是 React 與 Redux 共同使用,aka React-Redux。因此在本篇文章中,想要進一步探討 React-Redux 的核心部分的實踐,主要聚焦於 Provider 元件與 connect 方法。
目前最常見是用 Hooks 的方式,而非 connect 的方法去整合 React-Redux props 到 React component,然而,雖然兩者表層的 API 使用方式差異大,但背後要達成的最終目的是差不多的,都是在實踐「讓 React components,能連結 Redux store,藉使能獲取全域資料與更新全域資料」,加上最近在工作上,持續開發、維護 5 年以上的專案,依然有碰到 connect,於是想更深入瞭解之,所以本篇文章會以 connect (HOC 概念) 而非 Hooks 為主軸,探討 Redux 與 React 的結合。
另外也私心認為,能了解這類有歷史的技術,也是蠻有趣的事呢。
期許閱讀完本文後,能達成:
- 理解 React-Redux 是什麼
- 理解 Provider/connect 核心概念、使用方式
- 能夠實作簡單版本的 Provider/connext
先來談談 React-Redux 是什麼
至今依然有人會誤以為 Redux 只在 React 中使用,這是很大的誤會。
Redux 是基於 Flux 流程概念實踐的集中式資料狀態管理的工具,可以使用在 JavaScript 開發的應用程式中管理資料 state,並不限定於單一框架。
而 React-Redux 是 Redux 在 React 應用程式中的實踐,讓 React components 能從 Redux store 中讀取資料,並能 dispatch action 到 store 來更新 state。
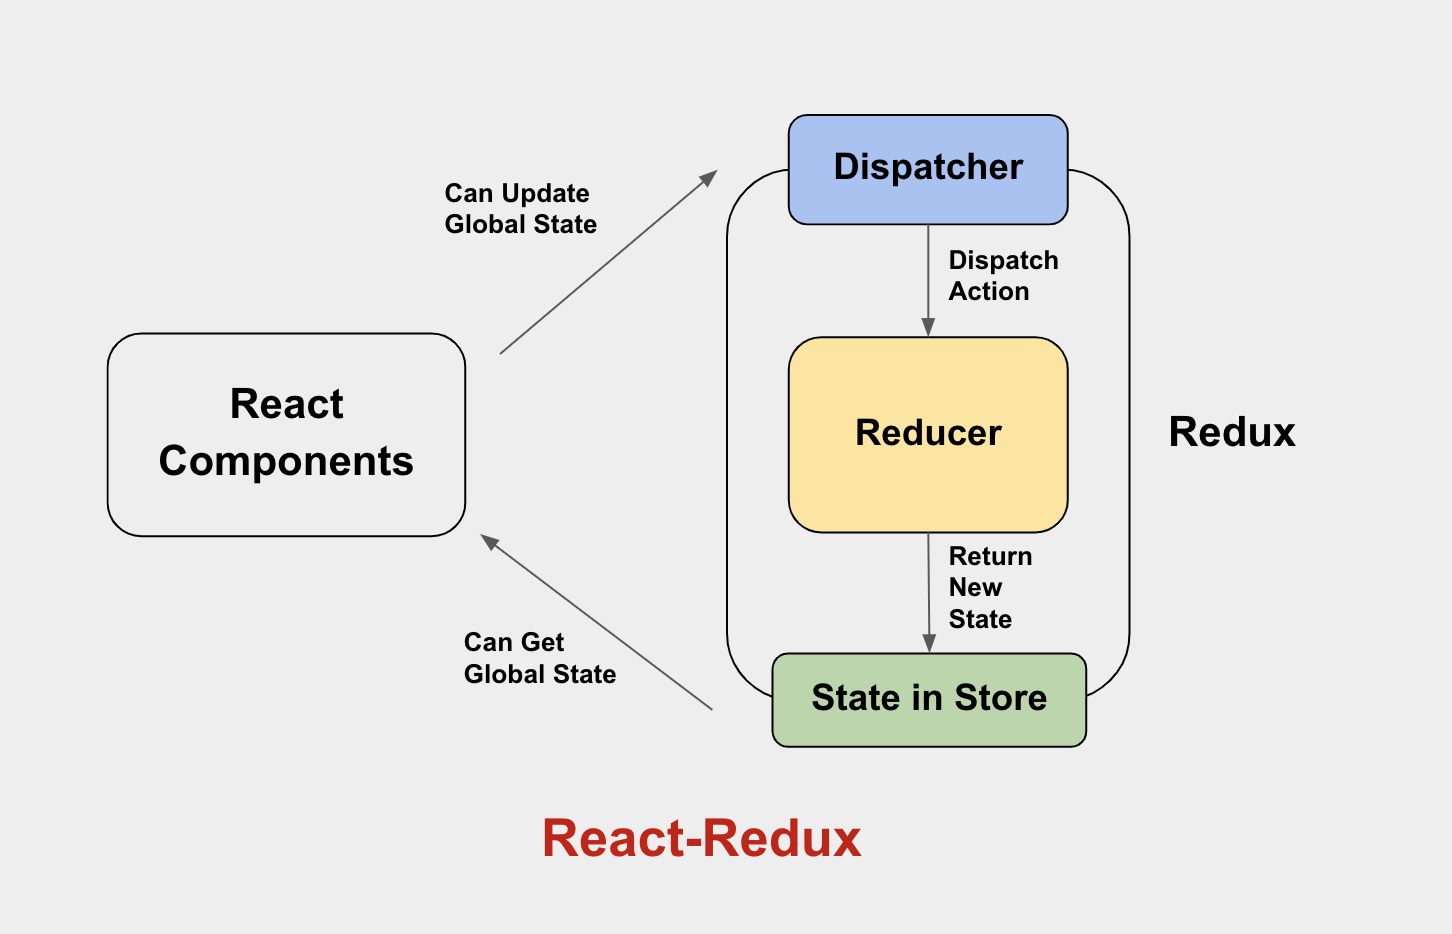
上方的概念圖,很簡要地表達 React-Redux 的角色。
而 React-Redux 官方文件則是這麼描述:
React Redux is the official React UI bindings layer for Redux. It lets your React components read data from a Redux store, and dispatch actions to the store to update state.
由上述進一步思考,能了解到:若要達成 React components 能使用 Redux,背後代表的意義是「每個 React components 只要有需要,就能取得 Redux store 提供的 state/dispatch,並使用之」
要達成這個目的,會需要:
- 需有個方式,能將 store 提供給每個 components => Provider。
- 需有個方式,能從 components props 中,取用 store state/dispatch => connect。
接續,將先從理解 Provider / connect 的定義與使用方式談起。
p.s. 隨著 React, React-Redux 版本不同,使用 Provider / connect 的方式以及其原始碼會有所不同,本文撰寫的範例不一定是最新版本的寫法,但核心概念差異不大,仍可參考並有所學習。
Provider 的概念定義與使用方式
Provider 元件是 React-Redux 的核心元件之一。這個元件主要負責接收 Redux 的 store,並將其作為 props 傳遞,讓所有被 Providr 包裹的子元件都能使用 store 相關功能,透過以下程式碼範例,能快速知道 Provider 的使用方式:
/*** index.js ***/
import React from 'react';
import ReactDOM from 'react-dom';
import { Provider } from 'react-redux';
import { createStore } from 'redux';
import Counter from './Counter';

// 自定義 reducer function
const reducer = (state = { count: 0 }, action) =>  {
  switch (action.type) {
    case 'INCREMENT':
      return { count: state.count + 1 };
    case 'DECREMENT':
      return { count: state.count - 1 };
    default:
      return state;
  }
}

// 用 redux 提供的 createStore 創建 store
const store = createStore(reducer);

ReactDOM.render(
  // 透過 react-redux 提供的 Provider,將 store 作為 props 傳遞,
  // 藉此讓 Provider 包裹的子組件,都獲得取用 store 的能力
  <Provider store={store}>
    <Counter />
  </Provider>,
  document.getElementById('root')
);
在大部分的專案中,為了讓所有 components 都能取用 store,會直接用 Provider 包裹 App 元件:
/*** index.js ***/
......

import App from './App';

......

ReactDOM.render(
  // Provider 包裹 App,讓 App 底下的 components 都能取用 store
  <Provider store={store}>
    <App />
  </Provider>,
  document.getElementById('root')
);
其實在官方文件中,已將 Provider 說得容易理解:
The <Provider> component makes the Redux store available to any nested components that need to access the Redux store.
Since any React component in a React Redux app can be connected to the store, most applications will render a <Provider> at the top level, with the entire app’s component tree inside of it.
Connect 的概念定義與使用方式
接續關注 connect 的概念和使用方式:
connect 是 React-Redux 的核心方法,顧名思義是「連結」的概念,能將 Redux store 實際連結到 React components。換句話說,透過 connect 能將 Redux store 中的 state 狀態和 dispatch 方法連接到 React components 的 props 中,使 React components 能使用之。
如果第一次看到 Provider 與 connect ,可能會覺得兩者都是將 store 跟 React components 結合,但「概念上」到底差異在哪?
- Provider 是提供者,將 store 「提供」給所有 components,但不代表每個 components 都需要去實際地使用 store state/dispatch。
- connect 是連接者,讓真正需要使用 store state/dispatch 的 components,實際和 store「連接」在一起,藉此能在 componets props 中取用 store state/dispatch。
延續上面 Provider 使用的範例程式碼,可以在 Counter component 中,使用 connect:
/*** Counter.js ***/
import { connect } from 'react-redux';

// 宣告 Counter component,從 props 中取到 store state/dispatch,
// 背後有 connect 的協助,才能做到在 props 中取用這些項目
const Counter = ({
  count,
  increment,
  decrement
}) => {
  return (
    <div>
      <button onClick={decrement}>-</button>
      <span>{count}</span>
      <button onClick={increment}>+</button>
    </div>
  );
}

// 宣告 mapStateToProps,
// 設定 Counter 需要取用的 store state
const mapStateToProps = (state) => ({
  count: state.count,
});

// 宣告 mapDispatchToProps,
// 設定 Counter 需要取用 store dispatch actions
const mapDispatchToProps = (dispatch) => ({
  increment: () => dispatch({ type: 'INCREMENT' }),
  decrement: () => dispatch({ type: 'DECREMENT' }),
});

// 用 connect 將 Counter 與 store 連結,
// 藉此能從 Counter props 中取用 count 資料 & increment, decrement 方法
export default connect(mapStateToProps, mapDispatchToProps)(Counter);
從上述的使用中,能發現 connect API 的使用方式,可以傳入兩組參數。
- 第一組參數,可傳入
mapStateToProps,mapDispatchToProps:
-
mapStateToProps: 是個函數,此函數的 input 接收 Redux store 的 state,然後 output 則 return object,該 object 的 key 值會被傳遞給 component 作為 props 取用。如此就能定義好哪些 Redux store state 需要傳遞給 component。
-
mapDispatchToProps: 也是個函數,此函數的 input 接收 Redux store 的 dispatch,然後 output 則 return object,該 object 的 key 值也會被傳遞給 component 作為 props 取用。如此就能定義好更新 Redux store 的函數,這些函數可以 dispatch actions 到 Redux store 更新 state。
以範例程式碼而言,透過 mapStateToProps, mapDispatchToProps 進而定義取用 counter state 以及 increment, decrement dispatch actions 的方法。
p.s. connect 第一組參數,還可再傳入 mergeProps, options,在此先不討論。
- 第二組參數,可傳入 component:
connect 是 HOC (High Order Component) 的實踐。簡單來說,HOC 是一個函數,該函數可接收一個 component 作為參數,並最終返回一個新的 component。這個新的 component 通常會擴充或修改原始 component 的 props 或行為。
以範例而言,第二組參數傳入的是 Counter component,最終讓 Counter props 多添加 count state, increment、 decrement methods。
從上述介紹中,已可大致了解 Provider 及 connect 的概念和用法,接著將會開始實作這兩個由 React-Redux 提供的 API,藉此更了解其原理。
透過 Context API 實作簡易的 Provider 和 connect
要做出 Provider 及 connect,最基本核心的部分,就是要有種方式,能讓無論是哪個 React component 都能「簡便地」獲取單一來源的 store,並可以修改之。
特別標注簡便地,是希望這個獲取方式,不是一直透過 props 傳遞,那樣會形成 prop drilling 的問題,當 component 很多層時會很難維護。
如果寫過 React 一陣子,看完上述大概能很直覺的想到 React 所提供的 Context API。React 的 Context API 允許在 component tree 中的所有級別上,傳遞和共享資料,而無需逐級傳遞 props,能避免 prop drilling,這在管理全域狀態或多層 component 共用資料時,特別有用。
使用方式簡言之:
- 首先要創建一個 Context,透過
React.createContext(defaultValue),能創建 Context 對象。 - 再來可以透過 Context 對象提供的
Provider將頂層父 component 包裹住,並將需要共享的值,傳給valueprop。 - 最後,在有需要提取共享值的子層 component 中,使用
useContext就能獲得共享值。
import { createContext, useContext } from 'react'

// 創建一個 Context,default 可傳可不傳
const ThemeContext = createContext()

// 在頂層父元件外,使用 Provider 包裹,共享 ThemeContext 的 value
const App = () => {
  return (
    <ThemeContext.Provider value="light">
      <Header />
    </ThemeContext.Provider>
  )
}

// 在 Header 元件(或其任何子元件)中,可以簡單地訪問 theme value
const Header = () => {
  return (
    <div>
      <ThemedButton />
    </div>
  )
}

// 在 ThemedButton 中,使用 useContext Hook 訪問 theme value
const ThemedButton = () => {
  const theme = useContext(ThemeContext)
  return (
    <button>
      {theme === 'dark' ? 'Dark Mode' : 'Light Mode'}
    </button>
  )
}
看完範例後,能舉一反三地,實作出最簡單的 Provider,其需要滿足:
- 可以傳入
storeprop。 - 可以包裹
childrencomponent。
/*** Provider.js ***/
import { createContext } from 'react'

// 創建一個 redux store 用的 context
const ReduxContext = createContext()

// 創建一個 Provider 元件,可以接收 store 與 children
const Provider = ({
  store,
  children
}) => {
  return (
    // 使用 ReduxContext 的 Provider,並將 store 傳入作為 value
    // 如此一來,底下的所有子元件,都能取用 store
    <ReduxContext.Provider value={store}>
      {children}
    </ReduxContext.Provider>
  )
}

export { Provider, ReduxContext }
當然,目前是最簡單的版本,後續還有很多可以優化之處。
用同樣的概念,能繼續實踐最簡單的 connect HOC,記得需要滿足:
- 第一組參數,可傳入
mapStateToProps,mapDispatchToProps。 - 第二組參數,可傳入 component。
- 最後會回傳新版本的 component,這個 component 的 props,需要加上透過
mapStateToProps,mapDispatchToPropsmap 取用的 state 以及更新 state 的方法。
/*** connect.js ***/
import { useContext } from 'react'
import { ReduxContext } from './Provider'

// 第一組參數可傳入 mapStateToProps, mapDispatchToProps
const connect = (mapStateToProps, mapDispatchToProps) => {
  // 第二組參數可傳入 WrappedComponent
  return function (WrappedComponent) {
    // 回傳 connected 完成的 Component,會接收到原本的 props
    return function ConnectedComponent(ownProps) {
      // 從 context 中取出 store
      const store = useContext(ReduxContext);
      // 將 store.getState() 傳給 mapStateToProps,回傳最終需使用的 store state
      const stateProps = mapStateToProps ?
        mapStateToProps(store.getState(), ownProps)
        : {};
      // 將 store.dispatch 傳給 mapDispatchToProps,回傳最終需使用的 dispatch methods
      const dispatchProps = mapDispatchToProps ?
        mapDispatchToProps(store.dispatch, ownProps)
        : {};

      // 最終渲染的元件,已經組合所有需要的 props
      return (
        <WrappedComponent
          {...ownProps}
          {...stateProps}
          {...dispatchProps}
        />
      )
    }
  }
}
如此一來,透過 Context API,已實踐簡單版本的「讓 React component 獲取 store,並且融合到 props」需求。有了「獲取機制」後,接著要來更近一步實踐簡單版本的「更新機制」。
實踐 Provider 與 connect 中更新元件的機制
在先前實踐中,已經能獲取 store 使用了。然而,假設真的觸發 props 中的 dispatch method ,像是前面範例的 increment / decrement,藉此更新 store 中的 count 後,真的能觸發相關元件的重新渲染嗎?
不能,因為尚未實踐「觸發重新渲染」的機制,這個機制需要包含:
- 若 store state 更新,需要觸發 Provider 將新的 state 傳下去
- 若 connect 有接收到新的 state 變化,需要觸發更新渲染 component
「當 state 改變後,要觸發 xxx 的行為」,這句話會最直覺聯想到 store.subcribe(fn) 這個 API:當 store state 改變時,就觸發 fn,藉由這個概念,來改寫程式碼:
/*** Provider.js ***/
import { createContext, useState, useEffect } from 'react'

const ReduxContext = createContext()

const Provider = ({
  store,
  children
}) => {
  const [_, forceUpdate] = useState(store.getState());

  // 透過訂閱的方式,讓 store 更新時,會觸發 forceUpdate
  // 藉此讓 Provicder 把最新的 store 提供出去
  useEffect(() => {
    const unsubscribe = store.subscribe(() => {
      forceUpdate(store.getState());
    });
    return () => {
      unsubscribe();
    };
  }, [store]);

  return (
    <ReduxContext.Provider value={store}>
      {children}
    </ReduxContext.Provider>
  )
}

export { Provider, ReduxContext }
/*** connect.js ***/
import {
  useContext,
  useState,
  useEffect
} from 'react'
import { ReduxContext } from './Provider'

const connect = (mapStateToProps, mapDispatchToProps) => {
  return function (WrappedComponent) {
    return function ConnectedComponent(ownProps) {
      const store = useContext(ReduxContext);
      const stateProps = mapStateToProps ?
        mapStateToProps(store.getState(), ownProps)
        : {};
      const dispatchProps = mapDispatchToProps ?
        mapDispatchToProps(store.dispatch, ownProps)
        : {};

      // 加上下面這段,達成:更新 store 時,要重新渲染 component 的機制
      const [_, forceUpdate] = useState({});
      useEffect(() => {
        const unsubscribe = store.subscribe(() => {
          // 在 store 變化時,會強制重新渲染用到 connect 的 component
          forceUpdate({});
        });
        return () => {
          unsubscribe();
        };
      }, [store]);

      return (
        <WrappedComponent
          {...ownProps}
          {...stateProps}
          {...dispatchProps}
        />
      )
    }
  }
}
這邊特別強調:為什麼 Provider 與 connect 中,都必須要加入更新機制?
因為兩者目的不同:
- Provider 中的更新機制:確保新的 store 都有被傳入要用到的 component
- connect 中的更新機制:確保有用到更新 store 的 component 有被重新渲染
如果把 connect 的更新機制拔掉,可能變成 component 沒有把最新資料渲染的問題。
至此,用了容易理解的實作模式,實踐的簡單版本的更新方式,下一步,將來進一步優化之。
近一步優化 Prodiver 和 connect 的效能
對於上述已經實踐的 Provider,可以進一步優化,確保 store.getState() 有更新後,才會 forceUpdate。
要實踐這件事情做法不止一種,在此透過 useRef 來實踐:
/*** Provider.js ***/
import {
  createContext,
  useState,
  useEffect,
  useRef
} from 'react'

const ReduxContext = createContext()

const Provider = ({
  store,
  children
}) => {
  const [_, forceUpdate] = useState({});
  // 將 store.getState 透過 useRef 存起來
  const storeStateRef = useRef(store.getState());

  useEffect(() => {
    const unsubscribe = store.subscribe(() => {
      // 假如最新的 store state 不等於上一版的 pre store state 才更新
      const newState = store.getState();
      if(newState !== storeStateRef.current){
        storeStateRef.current = newState;
        forceUpdate({});
      }
    });
    return () => {
      unsubscribe();
    };
  }, [store]);

  return (
    <ReduxContext.Provider value={store}>
      {children}
    </ReduxContext.Provider>
  )
}

export { Provider, ReduxContext }
這樣算是用簡單的方式,達到減少 forceUpdate 觸發的概念,當然,可以對 connect 做類似的邏輯,利用 useRef 去降低不必要的 render:
/*** connect.js ***/
import { useContext, useRef } from 'react'
import { ReduxContext } from './Provider'
import shallowEqual from './shallowEqual' // 假定已製作好 shallowEqual

const connect = (mapStateToProps, mapDispatchToProps) => {
  return function (WrappedComponent) {
    return function ConnectedComponent(ownProps) {
      const store = useContext(ReduxContext);
      const stateProps = mapStateToProps ?
        mapStateToProps(store.getState(), ownProps)
        : {};
      const dispatchProps = mapDispatchToProps ?
        mapDispatchToProps(store.dispatch, ownProps)
        : {};
      // 利用 useRef 將 props, stateProps, dispatchProps 存起來
      const storedOwnProps = useRef(ownProps)
      const storedStateProps = useRef(stateProps)
      const storedDispatchProps = useRef(dispatchProps)

      const [_, forceUpdate] = useState({});
      useEffect(() => {
        const unsubscribe = store.subscribe(() => {
          const newStateProps = mapStateToProps ?
            mapStateToProps(store.getState(), ownProps)
            : {};
          const newDispatchProps = mapDispatchToProps ?
            mapDispatchToProps(store.dispatch, ownProps)
            : {};
          // 當 combinedProps 內容有改變時,才觸發 forceUpdate 重新渲染
          if (
            !shallowEqual(storedOwnProps.current, ownProps) || !shallowEqual(storedStateProps.current, newStateProps) ||
            !shallowEqual(storedDispatchProps.current, newDispatchProps)
          ) {
            storedOwnProps.current = ownProps;
            storedStateProps.current = newStateProps;
            storedDispatchProps.current = newDispatchProps;
            forceUpdate({});
          }
        });
        return () => {
          unsubscribe();
        };
      }, [store]);

      return (
        <WrappedComponent
          {...storedOwnProps.current}
          {...storedStateProps.current}
          {...storedDispatchProps.current}
        />
      )
    }
  }
}
當然,比起真正的原始碼,還有很多可以進一步優化之處,然而至此算是實踐的減少不必要的 re-render 概念。
這邊我最好奇的地方會在於「為什麼 Provider 中使用 strict equlity === 而在 connect 中使用 shallow equality 處理呢?」
原因在於在 reducer 中,如果 state 沒有被更新,會回傳原本的 state,即便這個 state 是 object value,兩者 reference 會一致,不會觸發 force update 更新,所以 store.getState() 可以直接用 strict equlity 比對。
舉個 reducer 程式碼來解釋:
function accountReducer(state = {price: 0, credit: 0}, action) {
  switch (action.type) {
    case 'INCREMENT_PRICE':
      // 如果有改變,會回傳 reference 不同的 object
      return {...state, price: state.price + 1};
    case 'DECREMENT_PRICE':
      // 如果有改變,會回傳 reference 不同的 object
      return {...state, price: state.price - 1};
    default:
      // 如果沒改變,會回傳原本的 object,reference 一樣
      return state;
  }
}
至於 connect 中需要用到 shallow equality 則是因為每次 stateProps 以及 dispatchProps 都會產生新的物件,即便裡面的 key value 完全相同,但如果 reference 不同,用 strict equlity 比對之下,就依然會觸發 force update,導致每次還是被更新,所以必須用 shallow equality 比對才有意義。
const mapStateToProps = (state) => {
  return {
    price: state.price,
    credit: state.credit
  };
}

export connect(mapStateToProps, null)(component)

// 當在 connect 中,觸發 const stateProps = mapStateToProps(store.getState() 時,
// stateProps 這個 object 的 reference 永遠是新的,因此:
// 若用 === 比對,reference 每次都不同,每次都被更新。
// 若用 shallow equality 比對,能真正比對 key value 是否不同,值不同才會被更新。
以上的小補充,希望能讓這個「比對方式」的細節被理解得更快。
總結,回顧最初的目標
其實演變到現在,react-redux 的原始碼相較於 redux 複雜不少,本文算是用比較簡單的方式實踐基礎概念,藉以理解 react 與 redux 間的交互,如果還想看更多細節的實踐、更多延伸情境的處理,可以接著閱讀原始碼囉。
最初期待閱讀本文後,能夠:
- 理解 React-Redux 是什麼
- 理解 Provider/connect 核心概念、使用方式
- 能夠實作簡單版本的 Provider/connext
1.理解 React-Redux 是什麼
Redux 是基於 Flux 流程概念實踐的集中式資料狀態管理的工具,可以使用在 JavaScript 開發的應用程式中管理資料 state,並不限定於單一框架。
而 React-Redux 是 Redux 在 React 應用程式中的實踐,讓 React components 能從 Redux store 中讀取資料,並能 dispatch action 到 store 來更新 state。
2.理解 Provider/connect 核心概念、使用方式
Provider 主要負責接收 Redux 的 store,並將其作為 props 傳遞,讓所有被 Providr 包裹的子元件都能使用 store 相關功能。
connect 能將 Redux store 中的 state 狀態和 dispatch 方法連接到 React components 的 props 中,使 React components 能使用之。
- Provider 是提供者,將 store 「提供」給所有 components,但不代表每個 components 都需要去實際地使用 store state/dispatch。
- connect 是連接者,讓真正需要使用 store state/dispatch 的 components,實際和 store「連接」在一起,藉此能在 componets props 中取用 store state/dispatch。
程式使用上的舉例:
/*** index.js ***/
......

import App from './App';

......

ReactDOM.render(
  <Provider store={store}>
    <App />
  </Provider>,
  document.getElementById('root')
);
/*** Counter.js ***/
import { connect } from 'react-redux';

const Counter = ({
  count,
  increment,
  decrement
}) => {
  return (
    <div>
      <button onClick={decrement}>-</button>
      <span>{count}</span>
      <button onClick={increment}>+</button>
    </div>
  );
}

const mapStateToProps = (state) => ({
  count: state.count,
});

const mapDispatchToProps = (dispatch) => ({
  increment: () => dispatch({ type: 'INCREMENT' }),
  decrement: () => dispatch({ type: 'DECREMENT' }),
});

export default connect(mapStateToProps, mapDispatchToProps)(Counter);
3.能夠實作簡單版本的 Provider/connext
上述內文算是描述的蠻詳細地,因此這邊就直接透過程式碼複習:
/*** Provider.js ***/
import {
  createContext,
  useState,
  useEffect,
  useRef
} from 'react'

// 創建一個 redux store 用的 context
const ReduxContext = createContext()

// 創建一個 Provider 元件,可以接收 store 與 children
const Provider = ({
  store,
  children
}) => {
  // 創建 forceUpdate 用來重新渲染 Provider,更新之
  const [_, forceUpdate] = useState({});
  // 將 store.getState 透過 useRef 存起來
  const storeStateRef = useRef(store.getState());

  useEffect(() => {
    // 透過訂閱的方式,讓 store 更新時,會觸發 subscribe callback 邏輯
    const unsubscribe = store.subscribe(() => {
      const newState = store.getState();
      // 若最新的 store state 不等於上一版的 pre store state 就強制更新
      if(newState !== storeStateRef.current){
        storeStateRef.current = newState;
        forceUpdate({});
      }
    });
    return () => {
      unsubscribe();
    };
  }, [store]);

  return (
    // 使用 ReduxContext 的 Provider,並將 store 傳入作為 value
    // 如此一來,底下的所有子元件,都能取用 store
    <ReduxContext.Provider value={store}>
      {children}
    </ReduxContext.Provider>
  )
}

export { Provider, ReduxContext }
/*** connect.js ***/
import { useContext, useRef } from 'react'
import { ReduxContext } from './Provider'
import shallowEqual from './shallowEqual' // 假定已製作好 shallowEqual

// 第一組參數可傳入 mapStateToProps, mapDispatchToProps
const connect = (mapStateToProps, mapDispatchToProps) => {
  // 第二組參數可傳入 WrappedComponent
  return function (WrappedComponent) {
    // 回傳 connected 完成的 Component,會接收到原本的 props
    return function ConnectedComponent(ownProps) {
      // 從 context 中取出 store
      const store = useContext(ReduxContext);
      // 將 store.getState() 傳給 mapStateToProps,回傳最終的 store state
      const stateProps = mapStateToProps ?
        mapStateToProps(store.getState(), ownProps)
        : {};
      // 將 store.dispatch 傳給 mapDispatchToProps,回傳最終的 dispatch methods
      const dispatchProps = mapDispatchToProps ?
        mapDispatchToProps(store.dispatch, ownProps)
        : {};
      // 利用 useRef 將 props, stateProps, dispatchProps 存起來
      const storedOwnProps = useRef(ownProps)
      const storedStateProps = useRef(stateProps)
      const storedDispatchProps = useRef(dispatchProps)

      const [_, forceUpdate] = useState({});
      useEffect(() => {
        // 訂閱 store 更新時,透過 forceUpdate 重新渲染 component 的機制
        const unsubscribe = store.subscribe(() => {
          const newStateProps = mapStateToProps ?
            mapStateToProps(store.getState(), ownProps)
            : {};
          const newDispatchProps = mapDispatchToProps ?
            mapDispatchToProps(store.dispatch, ownProps)
            : {};
          // 當 combinedProps 內容有改變時,才觸發 forceUpdate 重新渲染
          if (
            !shallowEqual(storedOwnProps.current, ownProps) || !shallowEqual(storedStateProps.current, newStateProps) ||
            !shallowEqual(storedDispatchProps.current, newDispatchProps)
          ) {
            storedOwnProps.current = ownProps;
            storedStateProps.current = newStateProps;
            storedDispatchProps.current = newDispatchProps;
            forceUpdate({});
          }
        });
        return () => {
          unsubscribe();
        };
      }, [store]);

      // 最終渲染的元件,已經組合所有需要的 props
      return (
        <WrappedComponent
          {...storedOwnProps.current}
          {...storedStateProps.current}
          {...storedDispatchProps.current}
        />
      )
    }
  }
}
以上就是本文的所有內容,相較於前幾篇聚焦於探討 Redux,本篇較著重於 React 與 Redux 的交互核心元件,藉此能理解背後實踐的概略邏輯囉。
參考資料
- Provider 原始碼
- connect 原始碼
- React-redux | 為了瞭解原理,那就來實作一個 React-redux 吧!
- 從 source code 來看 React-Redux 怎麼讓 Redux 跟 React 共舞
- 與ChatGPT4對談完成
特別感謝
- 感謝 zacharyptt 在這則 issue 中,讓我意識到應為 shallow 而非 shadow equality。